| Sean McVeigh's MAME
Cabinet Project see MAMEWorld to figure out what on earth I'm talking about |
|
| Introduction Design Cabinet Controls Interfacing PC Guts Audio Video Links |
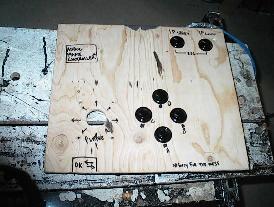
Design Perhaps design is a poor choice of headings for this section, as it turns out I didn't sit down and plan everything out in advance.. but then again, when I get started with something, it's often hard to drop it and step back before continuing. As such, this section details a progression of snippets of a complete design. After surfing around the web for a few days and coming across projects like ArcadeParadise, Blake's MAME Cabinet, Neil's MAME Cabinet, and dozens of other google hits, I decided on a design similar to Neil's. I knew I wanted to build a 4-player system after being frustrated trying to play Gauntlet (I only knew the controls for player 1 on the keyboard, and so I could only play the warrior character... later I discovered that the settings could be altered to select different players, but by then it was way too late), so I was quite partial to Neil's design. By this time I had already puchased a set of joysticks and buttons from eBay, so I threw together an ad-hoc 1-player controller to test the concept.  I know, I know.. where's the joystick? By the time I dug out my camera, I was already starting to construct the cabinet and by then I had partially disassembled the original test controls. Just imagine a black joystick sitting in that opening. After showing the guys at work (and watching eyes light up again), I knew I was on the right track. So what to do with this useless mock-up now? Find a way to get the controls to interact with the PC. I knew there were some products out there for sale that allow you to interface a bunch of switches through the keyboard port of the PC, which is perfect for an emulator that supports keyboard input. After taking a quick look at some of them, I figured I'd have a go at designing one myself which I could tailor to my needs. Although my formal education is in Computer Science, I have for the past 5 years been increasingly more interested in hardware design, and as such, designing a matrix switch and keyboard interface sounded like a fun project. I happened to have a microprocessor development kit at home, and since the beerbot was temporarily on hold, I figured I could donate it to the cause. I will bore you with the details in the Interfacing section. Suffice it to say that I got it more-or-less working after one night, but I spent a day or two in the lab at work with my rig hooked up to an oscilloscope and an array of PCs debugging one nagging problem. It was at this point that I decided that the project was viable and that I really had to keep going. So I spent an evening in AutoCAD laying out my control panel, complete with 4 joysticks and 2 trackballs for great games like Marble Madness, Centipede, etc. I managed to pick up a pair of 2-1/4" trackballs and got down to business building a mockup trackball control.  Again, I will bore you with the details later. Suffice it to say that getting trackballs to work with a PC is childs play. I should note at this point, that I still wasn't completely committed to actually constructing the full cabinet. I sort of wanted to try out the full control panel before diving into cabinet construction. For the sake of continuity, I'll just say that I built a mock-up and all the controls seemed to be in the right place and felt comfortable. For a while I figured I could just build a control panel and place it on a stand and that I could play games in front of the PC. After witnessing the sheer size of the mock-up, I decided that it wasn't the most portable-looking of things, and so I decided that it would need to be mated with a cabinet. The cabinet design was quite simple. I measured how high I wanted the control panel to sit, fired up AutoCAD again and drafted up a simple side view of what I wanted. I would build the cabinet so that it was much narrower than the control panel (as in Neil's MAME Cabinet) and I would put the cabinet on casters so that I could wheel it around as needed. More details on the cabinet are available in the Cabinet section. All that remained to be figured was the actual "game" part of the cabinet: the PC, and the A/V system. I had a rough idea of what I would do. I would get an older CPU and motherboard, hook up a 5 GB-or-so disk and mount everything directly to the inside of the cabinet. No sense mucking around with ATX cases and such. With plenty of PC guts lying around the house, this was the least of my worries. So as it stands, a full cabinet is in the works with a detachable control panel (so it will be able to fit through doorways). At this point, there was enough design done to proceed with the construction. ...more... |